Skip navigation

AWS EBS volume UUID collisions on a DB recovery attempt. On a system that does not have the current volume with conflicting disk UUID mounted -mount and then un-mount the vol to replay any metadata changes made when the snapshot was taken, get the current UUID then set the unique UUID to prevent collisions.

$ mount /dev/xvdz && umount /dev/xvdz
$ xfs_admin -lu /dev/xvdz
$ xfs_admin -U some-unique-uuid-string-thing /dev/xvdz

This didn’t occur to me until I was mounting the device, but I had a situation involving an I2C serial display (SSD1306) that needed to rotate it’s display 180 degrees to be easily readable. Due to memory constraints of the rest of the software I wasn’t able to include some of the more robust graphics libraries to drive it so I ended up having to manually alter the display buffer before each draw operation. This was the result.

Each character is a single byte array we are mirroring the bits horizontally and vertically, or flipping the MSB to LSB. This is a common textbook example modified to accommodate the display resolution.

void SSD1306::rotate180(void)
{
  // unsigned integer byte arrays
  uint8_t t;
  uint8_t p;

  // screen dimensions in bytes (1 byte per char)
  int byteCount = ((WIDTH * HEIGHT / 8) / 2) - 1;
  int bufferEnd = (WIDTH * HEIGHT / 8) - 1;

  // for each byte in display area
  for (uint16_t i = 0; i <= byteCount; i++)
  {
    p = 0;
    t = buffer[i];
    // for each bit in current character
    for (int j = 0; j <= 7; j++)
    {
      // shift p 1 bit left
      p = p << 1;
      if ((t & 0x01) > 0)
      {
        // bitwise or
        p = p | 1;
      }
      t = t >> 1;
    }

    // push flipped bit column to display buffer
    buffer[bufferEnd - i] = p;
    // get next byte/character from end of line
    t = buffer[bufferEnd - i];

    // repeat 
    p = 0;
    for (int j = 0; j <= 7; j++)
    {
      p = p << 1;
      if ((t & 0x01) > 0)
      {
        p = p | 1;
      }
      t = t >> 1;
    }
    // push flipped column of pixels
    buffer[i] = p;
  }

Turns out this would be much faster using a lookup table, but that requires more memory.

byte reverse[256] PROGMEM = {
      0x00, 0x80, 0x40, 0xC0, 0x20, 0xA0, 0x60, 0xE0, 0x10, 0x90, 0x50, 0xD0, 0x30, 0xB0, 0x70, 0xF0,
      0x08, 0x88, 0x48, 0xC8, 0x28, 0xA8, 0x68, 0xE8, 0x18, 0x98, 0x58, 0xD8, 0x38, 0xB8, 0x78, 0xF8,
      0x04, 0x84, 0x44, 0xC4, 0x24, 0xA4, 0x64, 0xE4, 0x14, 0x94, 0x54, 0xD4, 0x34, 0xB4, 0x74, 0xF4,
      0x0C, 0x8C, 0x4C, 0xCC, 0x2C, 0xAC, 0x6C, 0xEC, 0x1C, 0x9C, 0x5C, 0xDC, 0x3C, 0xBC, 0x7C, 0xFC,
      0x02, 0x82, 0x42, 0xC2, 0x22, 0xA2, 0x62, 0xE2, 0x12, 0x92, 0x52, 0xD2, 0x32, 0xB2, 0x72, 0xF2,
      0x0A, 0x8A, 0x4A, 0xCA, 0x2A, 0xAA, 0x6A, 0xEA, 0x1A, 0x9A, 0x5A, 0xDA, 0x3A, 0xBA, 0x7A, 0xFA,
      0x06, 0x86, 0x46, 0xC6, 0x26, 0xA6, 0x66, 0xE6, 0x16, 0x96, 0x56, 0xD6, 0x36, 0xB6, 0x76, 0xF6,
      0x0E, 0x8E, 0x4E, 0xCE, 0x2E, 0xAE, 0x6E, 0xEE, 0x1E, 0x9E, 0x5E, 0xDE, 0x3E, 0xBE, 0x7E, 0xFE,
      0x01, 0x81, 0x41, 0xC1, 0x21, 0xA1, 0x61, 0xE1, 0x11, 0x91, 0x51, 0xD1, 0x31, 0xB1, 0x71, 0xF1,
      0x09, 0x89, 0x49, 0xC9, 0x29, 0xA9, 0x69, 0xE9, 0x19, 0x99, 0x59, 0xD9, 0x39, 0xB9, 0x79, 0xF9,
      0x05, 0x85, 0x45, 0xC5, 0x25, 0xA5, 0x65, 0xE5, 0x15, 0x95, 0x55, 0xD5, 0x35, 0xB5, 0x75, 0xF5,
      0x0D, 0x8D, 0x4D, 0xCD, 0x2D, 0xAD, 0x6D, 0xED, 0x1D, 0x9D, 0x5D, 0xDD, 0x3D, 0xBD, 0x7D, 0xFD,
      0x03, 0x83, 0x43, 0xC3, 0x23, 0xA3, 0x63, 0xE3, 0x13, 0x93, 0x53, 0xD3, 0x33, 0xB3, 0x73, 0xF3,
      0x0B, 0x8B, 0x4B, 0xCB, 0x2B, 0xAB, 0x6B, 0xEB, 0x1B, 0x9B, 0x5B, 0xDB, 0x3B, 0xBB, 0x7B, 0xFB,
      0x07, 0x87, 0x47, 0xC7, 0x27, 0xA7, 0x67, 0xE7, 0x17, 0x97, 0x57, 0xD7, 0x37, 0xB7, 0x77, 0xF7,
      0x0F, 0x8F, 0x4F, 0xCF, 0x2F, 0xAF, 0x6F, 0xEF, 0x1F, 0x9F, 0x5F, 0xDF, 0x3F, 0xBF, 0x7F, 0xFF};

// screen dimensions in bytes (1 byte per char)
int byteCount = ((WIDTH * HEIGHT / 8) / 2) - 1;
int bufferEnd = (WIDTH * HEIGHT / 8) - 1;
void rotate180(void) {
  for (uint16_t i = 0; i <= byteCount; i++)
    buffer[bufferEnd - i] = reverse[i];
  }
}
Ran into a situation with an AWS AMI that was created with an insufficiently sized root partition. The volume ended up correctly sized but mostly unused. There are numerous procedures for this, but with varying tool sets and file system types.

  1. resize the partition (growpart is an utility alias of parted)
  2. resize the lvm2 partition
  3. extend the lvm2 volume to the remaining available space
  4. mount the partition
  5. update the file system to utilize the extended space

growpart /dev/xvdf 2
pvresize /dev/xvdf2
lvextend /dev/partnameVG/part2 -l+100%FREE
mount /dev/partnameVG/part2 /mount_point/
xfs_growfs /mount_point/

Note that for swap partitions, instead of resizing the file system you will be recreating the swap with mkswap.

mkswap /dev/partnameVG/part2

This shouldn’t have taken me as long as it did, but Java’s JDBC driver doesn’t always know what TZ to use or rejects what the system returns. You may see something like: org.apache.commons.dbcp.SQLNestedException: Cannot create PoolableConnectionFactory (The server time zone value 'CDT' is unrecognized or represents more than one time zone. You must configure either the server or JDBC driver (via the serverTimezone configuration property) to use a more specifc time zone value if you want to utilize time zone support.)

Yes, the mis-spelling of ‘specific’ is accurate to the output as out OpenJDK 1.8.0_181

You can attempt to push the TZ from the Java application but there’s no good reason the MySQL server shouldn’t be configured with a TZ. Check the server with:
SELECT @@global.time_zone

Then update /etc/myc.cnf with default-time-zone=Your/Timezone and restart.

If the server refuses to start and your sure of your timezone in my.cnf the MySQL tables might not be fully populated, to do so execute mysql_tzinfo_to_sql /usr/share/zoneinfo | mysql -u root mysql -p from a terminal on the server host.

refs:
MySQL Documentation on Default Timezone

Updating the postgresql timescale-db extension from pre 0.8.0-dev builds – you must re-create extension and hyper-tables, ie:
CREATE database dbname;
\c dbname
CREATE EXTENSION IF NOT EXISTS timescaledb CASCADE;
SELECT create_hypertable('time_table', 'time');

The ability to generate 3D objects from drawings isn’t a new technology, CNC lathes have been producing accurate three dimensional objects for decades out of a wide array of materials from various metals, wood, and plastics. Recently a far cheaper alternative known as 3D printing has become popular which can achieve a similar effect though in smaller scales and typically using less durable materials, which for most consumer/hobbyist goals is perfectly adequate. If you need a part that just isn’t made and know your way around a CAD tool, 3D printing is fast and cheap compared to what were at the time the only alternatives a few years ago.

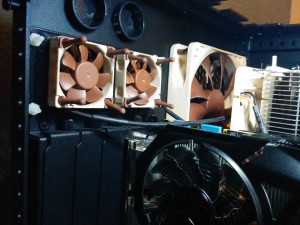
For this project, I needed an extra set of fans to help cool the GPU within a CaseLabs Mercury S5. The S5 is by far one of the highest quality and best designed cases I’ve ever used, though my particular air-cooled configuration was plagued with a bit more heat soak than I was happy with. I think at some point everyone goes through a liquid cooling phase, and ultimately grows out of it. For anyone running an air-cooled setup in an S5, here’s an easy way to improve the flow dynamics of the PCI-E compartment.

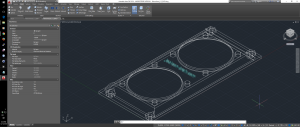
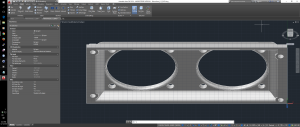
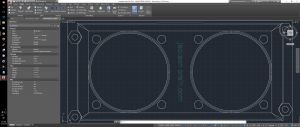
To design the manifold I spent an afternoon re-familiarizing myself with the latest version of AutoCAD using the free 30 day trial license. AutoCAD’s 3D tools have come a long way in the last few years and made the design phase a breeze. For the fans I selected a set of 40mm Noctua NF-A4x10 low noise fans. Knowing the dimensions of the fans and having direct access to the case I used a digital caliper to measure the location the manifold was to be placed and created the 2D overhead drawing using the SW corner as the origin.

Screenshot (15)

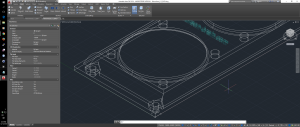
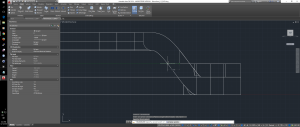
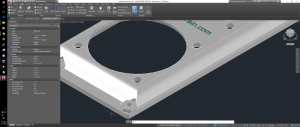
The next step was to extrude/pull the 2D structures into the final form of the manifold. A quick review of a few chapters in an undergrad physics book covering laminar flow/fluid dynamics and some dirty napkin mathematics provided the offset of the fan face and the rear ventilation plate, use of the filet tool to eliminate sharp edges in the flow path to reduce turbulence/resistance and noise resulted in a compact and low material design. It is important at this stage to understand the limitations of the particular material and printer you will be using, they all have specific resolutions and minimum thickness guidelines that need to be considered during design. For my particular combination I targeted a minimum of 1.2 mm. I had also already selected a set of nylon mounting hardware to reduce vibration and was able to incorporate structures to increase strength and rigidity as well as specific geometry to hold the mounting hardware in place.

Screenshot (10)

Screenshot (12)

Screenshot (16)

Screenshot (18)

Screenshot (20)

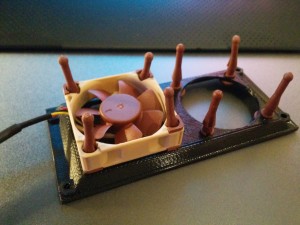
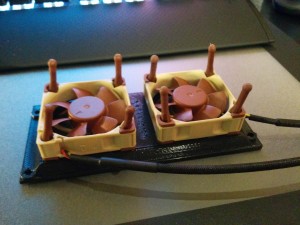
Once the final design was achieved, and all measurements double checked it was time to print. I chose my local UPS store for convenience, which uses a Stratasys uPrint SE Plus.

IMG_20151220_071011

IMG_20151220_071211

IMG_20151220_072913

Results were far better than expected and whisper quiet. The total printing cost was ~$21 USD, the fans were on sale for $8 a piece which brought the total cost (not including personal time) to ~$37 USD.

The final DWG and STL files:
40mmHood_1.3_EXP2.dwg
40mmHood_1.3_EXP2.stl

This is the second time I’ve run into this, so I’m making a note of it. If you’re compiling and installing git/gitweb outside of a package manager, the selinux file contexts might not be correct and prevent apache from being able to execute the gitweb CGI script. Something like this will appear in your /var/log/audit.log:
avc: denied { search } for pid=16678 comm="gitweb.cgi" dev=sda2 ...
avc: denied { read } for pid=16678 comm="gitweb.cgi" dev=sda2 ...
avc: denied { open } for pid=16678 comm="gitweb.cgi" dev=sda2 ...

To fix issue
$ sudo chcon -u httpd_git_script_exec_t /path/to/gitweb.cgi

If that doesn’t work your selinux policies might be different, you can try:
sudo restorecon -v /path/to/gitweb/dir/*

GDChart is a fairly old PHP extension, it’s origins are somewhere in 2003 and doesn’t seem to have been updated since 2006. The standard PECL sources won’t compile under any version of PHP greater than 5.3 due to a few changes in the Zend engine and GD dependencies. If you try, you’ll get a few error messages:
/gdchart-0.2.0/gdchart.c:195: error: expected ‘=’, ‘,’, ‘;’, ‘asm’ or ‘__attribute__’ before ‘gdchart_functions’
/gdchart-0.2.0/gdchart.c: In function ‘gdc_objects_new’:
/gdchart-0.2.0/gdchart.c:303: error: ‘zend_class_entry’ has no member named ‘default_properties’
/gdchart-0.2.0/gdchart.c: At top level:
/gdchart-0.2.0/gdchart.c:360: error: ‘gdchart_functions’ undeclared here (not in a function)

If you’re in a hurry or your C/C++ is a little rusty you’re in luck, this is how to fix it. In the source file gdchart-0.2.0/gdchart.c perform these replacements:

195c195
< function_entry gdchart_functions[] = {
---
> zend_function_entry gdchart_functions[] = {
303c303
< 	zend_hash_copy(intern->zo.properties, &class_type->default_properties, (copy_ctor_func_t) zval_add_ref, (void *) &tmp, sizeof(zval *));
---
> 	object_properties_init((zend_object*) &(intern->zo), class_type);

Then perform the usual extension compilation routine:
gdchart-0.2.0]$ phpize
gdchart-0.2.0]$ ./configure
gdchart-0.2.0]$ make && make test

As you can see, you’re not done. Don’t try to install this module yet it won’t load, failing with PHP Warning: PHP Startup: Unable to load dynamic library '/home/jack/build/gdchart-0.2.0/modules/gdchart.so' - /home/jack/build/gdchart-0.2.0/modules/gdchart.so: undefined symbol: php_gd_gdFontMediumBold in Unknown on line 0

Now we have to patch some PHP GD core files to accommodate changes in the visibility of a few GD resources, fortunately we have a patch for that here:https://github.com/arete/t2/blob/master/package/php/php/libgd-symbol-visibility.patch.

After patching the PHP sources, recompile and install along with the GDChart extension. Or do what any sane person would do and use a more recent and maintained visualization library like PHPlot, pChart or Google Charts.

This was a real annoyance to sort out, and I’ll likely need to do this again on the next kernel update so I’m documenting it here. The Corsair K70 is a great device, ignoring the pretty lights it’s a solid input device though it does have one particularly annoying functional aspect in various versions of Linux and that is an approximate 12-30 second delay during boot where the USB polling routine fails to enumerate the device (during report ret.) and time out before continuing. The following pertains to Ubuntu and Fedora/CentOS.

In your boot log (/var/log/boot.log) you will see a series of logged events similar to this:

workstation kernel: [   11.945167] hid-generic 0003:1B1C:1B13.0002: usb_submit_urb(ctrl) failed: -1
workstation kernel: [   11.945175] hid-generic 0003:1B1C:1B13.0002: timeout initializing reports
workstation kernel: [   11.945284] input: Corsair Corsair K70 RGB Gaming Keyboard  as /devices/pci0000:00/0000:00:14.0/usb2/2-10/2-10:1.1/0003:1B1C:1B13.0002/input/input15
workstation kernel: [   11.945373] hid-generic 0003:1B1C:1B13.0002: input,hidraw1: USB HID v1.11 Keyboard [Corsair Corsair K70 RGB Gaming Keyboard ] on usb-0000:00:14.0-10/input1
workstation kernel: [   21.954441] hid-generic 0003:1B1C:1B13.0003: timeout initializing reports
workstation kernel: [   21.954651] hid-generic 0003:1B1C:1B13.0003: hiddev0,hidraw2: USB HID v1.11 Device [Corsair Corsair K70 RGB Gaming Keyboard ] on usb-0000:00:14.0-10/input2
workstation kernel: [   31.967629] hid-generic 0003:1B1C:1B13.0004: usb_submit_urb(ctrl) failed: -1
workstation kernel: [   31.967642] hid-generic 0003:1B1C:1B13.0004: timeout initializing reports
workstation kernel: [   31.967762] hid-generic 0003:1B1C:1B13.0004: hiddev0,hidraw3: USB HID v1.11 Device [Corsair Corsair K70 RGB Gaming Keyboard ] on usb-0000:00:14.0-10/input3

As you can see the K70 is actually composed of 3 different input devices. The first being the light controller, the second being the the media controls and the third is the keyboard device which eventually loads. The first two fail during report retrieval and are the cause of the delay, this is likely a kernel bug and may take time before support is added. In the meantime we can get around the problem by introducing a usb “quirks” directive to instruct the kernel to not wait for these devices to be recognized/reported and continue.

To do this, find the devices vendor and device IDs:
~$ lsusb -v
which gives something like
Bus 002 Device 003: ID 1b1c:1b13 Corsair
Device Descriptor:
bLength 18
bDescriptorType 1
bcdUSB 2.00
bDeviceClass 0 (Defined at Interface level)
bDeviceSubClass 0
bDeviceProtocol 0
bMaxPacketSize0 64
idVendor 0x1b1c Corsair
idProduct 0x1b13

bcdDevice 1.30
iManufacturer 1
iProduct 2
iSerial 3
bNumConfigurations 1
Configuration Descriptor:
<<<******etc, etc******>>>

We need the ‘idVendor’ and ‘idProduct’ values to construct the quirks directive. Now open a terminal and use vim/nano/gedit/*whatever to open ‘/etc/modprobe.d/usbhid.conf’ and add the following:
options usbhid quirks=0x1B1C:0x1B13:0x20000000

The syntax of this directive is ‘usbhid quirks=vendor:product:quirk’, where ‘quirk’ is the defined instruction “HID_QUIRK_NO_INIT_REPORTS” defined in the 3.16 kernel sources ‘linux/hid.h’ -> #define HID_QUIRK_NO_INIT_REPORTS 0x20000000 This simply instructs the kernel not to attempt to generate a device report for the K70 on boot.

Now we need to rebuild initramfs to include the change in the root file system.
Ubuntu:~$ sudo update-initramfs -u
Fedora:~$ sudo dracut -f

Now reboot and notice there’s no more delay.

Spectrum analyzers are neat, software spectrum analyzers are not quite as neat but still useful. Spek (spɛk/, ‘bacon’ in Dutch) is a great library that provides a fast and accurate method to generate spectrograms. For one reason or another, it’s missing from recent repositories for RHEL derivatives, in this case Fedora 22. No worries, you can find the source on GitHub here.

Maybe you’ve broken your legs and are desperate for reading material, or have some neurological condition which compels you to actually read the instructions and attempt to run the autogen script and get a series of nasty error messages like
autoreconf: Entering directory `.'
autoreconf: running: intltoolize --automake --copy --force
autoreconf: running: aclocal --force
configure.ac:40: warning: macro 'AM_OPTIONS_WXCONFIG' not found in library
configure.ac:42: warning: macro 'AM_PATH_WXCONFIG' not found in library
autoreconf: configure.ac: tracing
autoreconf: configure.ac: AM_GNU_GETTEXT_VERSION is used, but not AM_GNU_GETTEXT
autoreconf: configure.ac: not using Libtool
autoreconf: running: /usr/bin/autoconf --force
configure.ac:40: error: possibly undefined macro: AM_OPTIONS_WXCONFIG
If this token and others are legitimate, please use m4_pattern_allow.
See the Autoconf documentation.
configure.ac:42: error: possibly undefined macro: AM_PATH_WXCONFIG
autoreconf: /usr/bin/autoconf failed with exit status: 1

First of all, if you’ve gotten this far you obviously have autoconf, automake, intltool, etc. already installed. Good job. What you are missing are a few of the pkg-config dependencies for GTK, which will be confusing because on Fedora at least these packages will be under wxGTK + wxGTK-devel, so to fix this:
sudo dnf install wxGTK wxGTK-devel

Now clean up your build dir with GIT and ./autogen.sh again.